Опыт использования менеджера паролей keepass: зачем он нужен, как установить и использовать
Содержание:
- Where can I find more application icons for Windows shortcuts?
- Преимущества
- File Format: XML (KeePass 1.x)
- KeePassium
- Events
- Пошаговая инструкция
- Running KeePass under Mono (Linux, Mac OS X, BSD, …)
- Changes from 2.27 to 2.28:
- Printing creates a temporary file. Will it be erased securely?
- How to store and work with large amounts of (formatted) text?
- Plugin Installation and Uninstallation
- Installer program (KeePass-1.xx-Setup.exe file)
- How to Import Data from Steganos Password Manager 2007
- Пленных не брать, незашифрованных не оставлять
- Installer program (KeePass-2.xx-Setup.exe file)
- Настройка KeePass
- Changes from 2.39.1 to 2.40:
Where can I find more application icons for Windows shortcuts?
|
Application icons are icons in Windows ICO format. They can be used in Windows shortcuts and/or as file association icons. The KeePass executable contains various application icons which can be used for these purposes. Additional application icons are available from the «» directories of the KeePass source code package. Most of them, shown at right, are slight variations of the main KeePass icon. Even more, contributed icons (by users) can be found on the . If you have multiple KeePass databases, you can use differently colored KeePass application icons in order to distinguish them. These icons are not included in the binary distribution because this would make the application file too large. |
Преимущества
- Очень высокая безопасность. Кроме технических деталей таких как: используемые алгоритмы кеширования и шифрования, важна для нас и поддержка двухфакторной аутентификации.
- Открыт исходный код. Есть такое мнение разработчиков и программистов, что надёжный и хороший криптографический софт просто не может быть закрытым. KeePass программа сертифицированная OSI Certified.
- Полная кроссплатформенность включая все операционные системы для мобильных устройств, исключение Symbian и WebOS.
- Что поражает так это бесплатность программы такого уровня, мощности и функциональности.
- Огромный плюс это — портативность. Кипас не нуждается в установке, легко может работать с флешки, она не создает и ничего не хранит в системе.
- Не нужна установка по строгой инструкции. Доступны два формата загрузки: инсталлятор и zip-файл. В сервис встроен генератор паролей.
File Format: XML (KeePass 1.x)
This section describes the KeePass 1.x XML format. Note that this format
is different from the XML format used by KeePass 2.x (anyway, KeePass 2.x
can import KeePass 1.x XML files).
You can download a detailed XML sample file here:
FileSample_XML.zip.
This file is zipped only in order to ensure correct encoding (if not zipped, browsers or
download managers could automatically convert the file to a different encoding). When importing
a XML file, it of course must not be zipped!
Important notes about the format:
- The files must be encoded using UTF-8 (Unicode). Other encodings are not supported.
- The following five entities must be encoded: . They are encoded
by . - The UUID is a hex-encoded 16-byte string (i.e. an 32 ANSI hex
character string in the XML file). It
is unique (also across multiple databases) and can be used to identify entries. - Dates/times are encoded in the standard date/time XML format (YYYY-MM-DDTHH:mm:ss):
first the date in form YYYY-MM-DD, a ‘T’ character, and the
time in form HH:mm:ss.
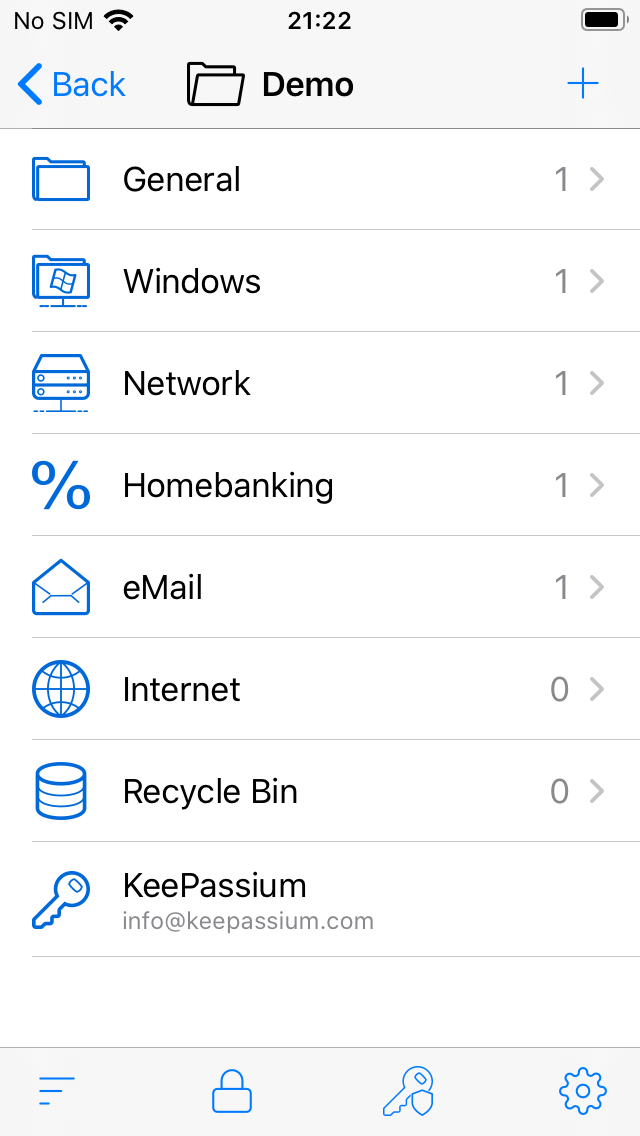
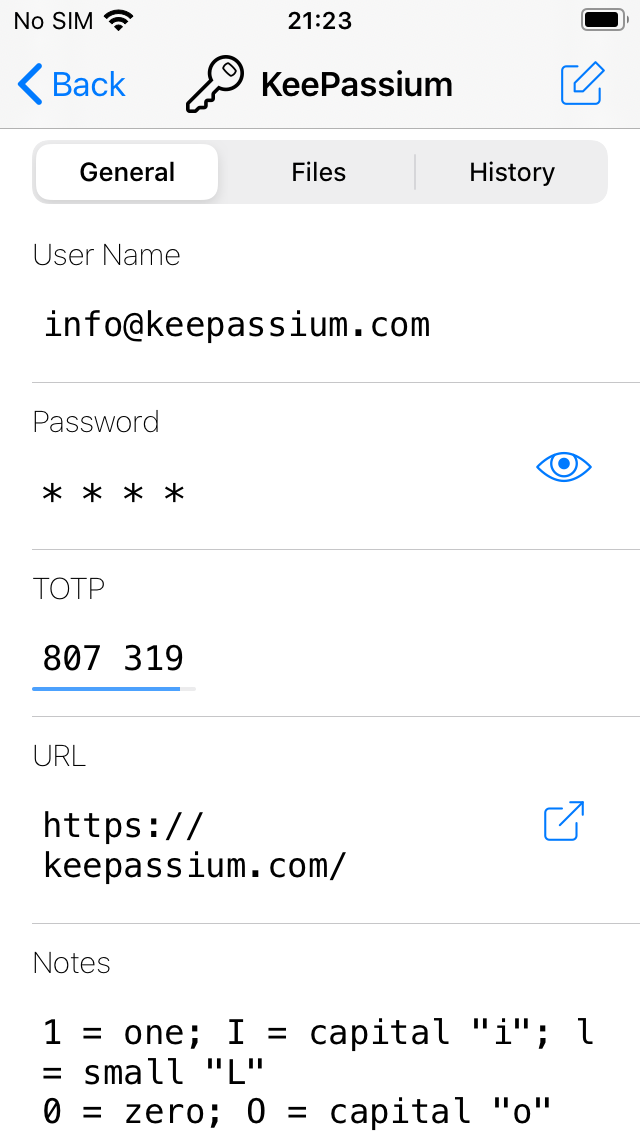
KeePassium
KeePassium features a clean well-polished interface and makes KeePass easy to use. It is a lightweight app that respects your privacy: offline-first, no ads, no analytics.
KeePassium interface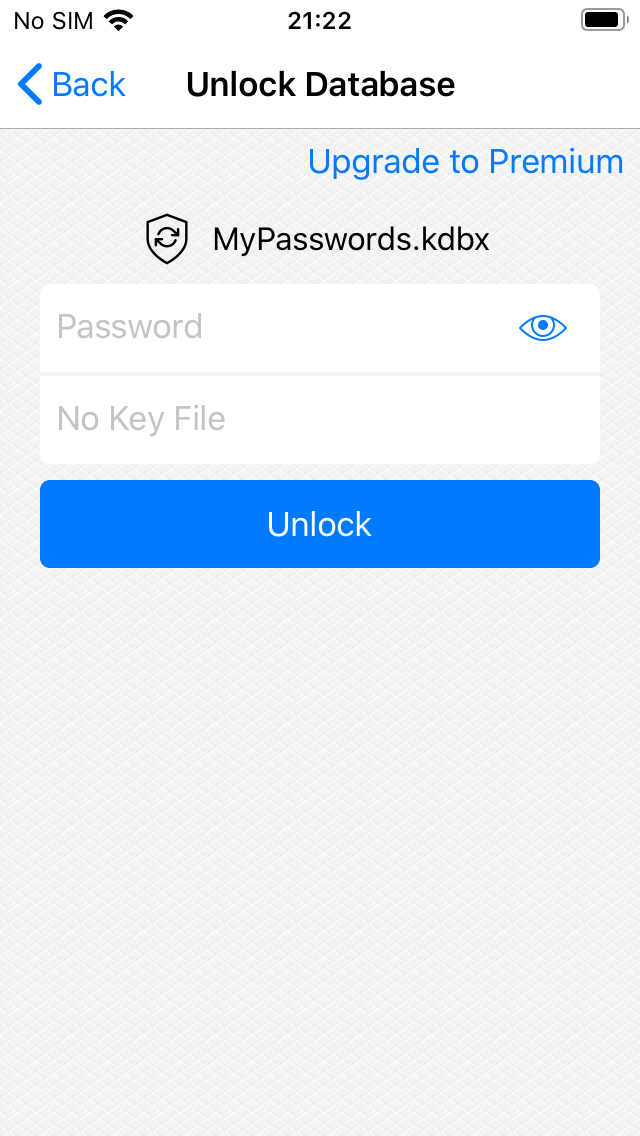
- Main features
- AutoFill, TouchID/FaceID, kdb/kdbx3/kdbx4, attachments, TOTP, YubiKey, iOS 13 support
- Missing pieces
- TOTP is read-only
- Synchronization
- Automatic sync via system integration (Files app), using the original cloud apps. This way, KeePassium itself stays offline).
- Transparency
- Open source (GPL-3.0)
- Maintenance / updates
- actively maintained
- User support
- very responsive
- Ethics
- published a critical review of competing apps (you are reading it now)
- Price
- free (no ads, no trial period) + premium upgrade for convenience features
Events
-
Application initialized:
This event occurs when KeePass has finished initializing, but didn’t perform
any main window automations (like opening a default database) yet. -
Application started and ready:
This event occurs when KeePass has started up, performed main window
automations (like opening a default database) and is ready for user actions. -
Application exit:
This event occurs when KeePass is about to exit. Databases have been closed
already, but resources (like fonts, …) are still valid. -
Opened database file:
This event occurs right after a database file has been opened successfully. -
Saving database file:
This event occurs right before a database file is saved. -
Saved database file:
This event occurs right after a database file has been saved successfully. -
Synchronizing database file:
This event occurs right before a database file is synchronized
with another database file. -
Synchronized database file:
This event occurs right after a database file has been synchronized
with another database file. -
Closing database file (before saving):
This event occurs right before a database file is closed.
It occurs before KeePass saves the database automatically or asks the
user whether to save unsaved changes. -
Closing database file (after saving):
This event occurs right before a database file is closed.
The database file already was saved automatically or unsaved changes were
saved/discarded depending on the user’s choice. -
Copied entry data to clipboard:
This event occurs when entry data (user name, password, …) is copied
to the Windows clipboard. -
Time — Periodic:
This event occurs at user-defined intervals.
The event is raised only if KeePass is not occupied
with a different task (like showing a subdialog).- Interval: Time span between the events, in seconds.
-
Restart timer on KeePass activity:
If this option is turned on, a KeePass activity
(user interaction, automation, subdialog, plugin activity, …)
causes a restart of the timer, i.e. one full interval must
pass for the next event.
-
Custom toolbar button clicked:
This event occurs when the user clicks a custom toolbar button. Custom
toolbar buttons can be created using the ‘Add custom toolbar button’
trigger action.
Пошаговая инструкция
Рассмотрим добавление и использование нового пароля на конкретном примере. Скажем, вам нужно зарегистрироваться на Одноклассниках и вы уже дошли до этапа, где вас просят придумать пароль.
- Открываете KeePass.
- Вводите мастер-пароль.
- Нажимаете Add Entry.
- В открывшемся окне пишете
-
- Title: Одноклассники
- User name: <ваш логин / номер телефона / почта>
- Password: он уже сгенерирован, но вы можете его настроить: выбрать длину или обязательные символы. Чтобы изменить пароль, нажмите Generate a password. Если же вас и так всё устраивает, жмите OK.
-
В редакторе можно настроить длину пароля и обязательные символы
Теперь вам достаточно дважды кликнуть ЛКМ по паролю, и он скопируется в буфер обмена.
Обратите внимание, что пароль копируется на ограниченное время (по умолчанию на 12 сек), а после удаляется из буфера. Кроме того, если вы ничего не делаете в программе какое-то время (по умолчанию 300 сек), она блокируется и для повторного использования вам снова нужно будет ввести мастер-пароль
Кроме того, если вы ничего не делаете в программе какое-то время (по умолчанию 300 сек), она блокируется и для повторного использования вам снова нужно будет ввести мастер-пароль.
Running KeePass under Mono (Linux, Mac OS X, BSD, …)
In addition to Windows, KeePass 2.x runs under Mono,
i.e. Linux, Mac OS X, BSD, etc.
Links to all supported packages can be found on the
Downloads page.
-
Debian/Ubuntu Linux:
Install the keepass2 /
KeePass 2.x for Debian/Ubuntu Linux package (e.g. using APT).
A link to a page with more information about this package can be found on the
downloads page. -
Fedora Linux:
Install the keepass package
(from the Fedora repository; link on the downloads page). -
OpenSUSE Linux:
Install the keepass package
(from the OpenSUSE Mono repository; link on the downloads page). -
Gentoo Linux:
Install the keepass package
(from the Gentoo Linux repository; link on the downloads page). -
Arch Linux:
Install the keepass package
(from the Arch Linux repository; link on the downloads page). -
Mac OS X:
Install the KeePass 2.x for Mac OS X package
(link on the downloads page). -
FreeBSD:
Install the keepass package
(from the FreeBSD ports tree or binary pkg repository; link on the downloads page). -
Other Unix-like systems:
In order to run KeePass, follow these steps:- Install Mono ≥ 2.6 (older versions will not work and are
not supported). Depending on your platform, the packages to install are called
, ,
or ; see
the Mono project page,
if you are unsure which packages to install. - On some platforms, the Windows Forms implementation (System.Windows.Forms)
is offered as a separate package. KeePass requires this package; so if you see one, install it, too. - On some platforms, the Runtime namespace (System.Runtime)
is offered as a separate package. KeePass requires this package; so if you see one, install it, too. - If you want to use auto-type on Linux / Mac OS X / BSD / etc., you additionally
need the package. - Download the portable version of KeePass (ZIP package)
and unpack it to a location of your choice. - When being in the KeePass directory, run the command line
«». Alternatively, right-click onto
the file, choose «Open with Other Application»
and type in as custom command.
For the last step you might want to create a shortcut
or shell script file with this command line (use an absolute path to
, if the shortcut / shell script file is in a
different location).Clipboard:
On some systems, Mono’s clipboard routines don’t work properly.
In this case, install the and packages.
If these are installed, KeePass uses them for clipboard operations.Global Auto-Type:
In order to use ,
you need to create an appropriate system-wide hot key. This only needs to be done
manually once. KeePass performs global auto-type when it’s invoked with
the command line option.Some examples how to create a system-wide hot key for global auto-type,
for different operating systems:-
KDE.
On Linux systems with KDE, the hot key can be created in Computer
→ System Settings → Shortcuts and Gestures:
in this dialog, go Edit → New → Global Shortcut →
Command/URL, specify the shortcut on the Trigger tab
and enter
into the Command/URL field on the Action tab. -
Ubuntu Linux ≥ 11.04 (Unity/GNOME).
Open the dialog Keyboard Shortcuts in the system preferences,
click the Add button, enter as name
and
as command, then click . Click on Disabled of the newly
created item (such that the text ‘New shortcut…’ appears),
press Ctrl+Alt+A, and close the dialog. -
Ubuntu Linux ≤ 10.10 (GNOME).
- Press Alt+F2,
enter and click . - Navigate to → → .
- Double-click one of the items, enter
and click . - Click the node on the left.
- Double-click the appropriate item
(for example, when you’ve used in the previous steps,
double-click now) and specify the hot key of your
choice. For example, to use Ctrl+Alt+A
as hot key, you’d enter .
- Press Alt+F2,
Important: for global auto-type, the version of the package
must be 2.20100818.3004 or higher! If your distribution only offers an
older version, you can download and install the latest version of the
package manually, see the website.Auto-Type on Wayland:
If you want to use auto-type on a system with a Wayland compositor,
see the Auto-Type on Wayland page.Plugins:
On some Linux systems, the package may be
required for plugins to work properly.TLS 1.2:
For TLS 1.2 support, Mono 4.8.0 or higher (or .NET Framework 4.5 or higher)
is required. - Install Mono ≥ 2.6 (older versions will not work and are
Changes from 2.27 to 2.28:
New Features:
- Enhanced high DPI support.
- Added trigger action
‘Show message box’ (which can abort the
current trigger execution or execute a command line / URL). - The ‘Database has unsaved changes’ trigger condition now
supports choosing between the active database and the
database that triggered the event. - Added parameter for the trigger action ‘Activate database
(select tab)’ that allows activating the database that
triggered the event. -
Auto-Type:
added workaround for KiTTY’s default Ctrl+Alt
behavior (which differs from Windows’ behavior). - Auto-Type: added workaround for PuTTYjp’s default Ctrl+Alt
behavior (which differs from Windows’ behavior). - Added up/down arrow buttons for reordering auto-type
associations in the entry editing dialog. - While entering the master key on a
, dimmed
screenshots are now also displayed on all non-primary screens. - Added support for importing
VisKeeper 3.3.0 TXT files. - The group tree view is now saved and restored during most
group tree updates. - In the main entry list, multiple entries can now be moved by
one step up/down at once. - If Caps Lock is on, a balloon tip indicating this is now also
displayed for password text boxes immediately after opening a
dialog (where the password text box is the initially focused
control). - In the cases where Windows would display outdated thumbnail
and peek preview images for the main window, KeePass now
requests Windows to use a static bitmap instead (showing only
the KeePass logo). - Added fallback method for parsing dates/times (the default
parser fails for some custom formats specified in the Control
Panel). - Added workaround for .NET height bug.
- Added own
for Unix-like systems (as
Mono doesn’t provide any effective memory protection method). - On Unix-like systems, Shift+F10 (and Ctrl+Alt+5 and
Ctrl+NumPad5 on Mac OS X) now shows the context menu in most
list/tree view controls and rich text boxes (like on Windows). -
KPScript: for the
» command, a different master key
can now be specified using the standard master key command
line parameters with the prefix » (e.g. ). - KPScript: added option » for the
» command. - KPScript: added » and » entry
identification parameters.
Improvements / Changes:
- Improved compatibility with ClearType.
- Improved support for high contrast themes.
- When duplicating a group/entry, the creation time and the
last access time of the copy are now set to the current time. -
dialog: initially the text box is now
focused, improved tab order, and picked characters are now
inserted at the current insertion point (instead of the end). - Ctrl+Tab is now handled only once when the database tab bar
has the focus. - When exporting to a KeePass 1.x KDB file, a warning/error is
now shown if the master key contains/is
a Windows User Account. - Unknown trigger events/conditions/actions are now ignored by
the trigger dialog. - Reduced group tree view flickering.
- Improved default value for the entry history size limit.
- Improved menu check mark and radio images.
- Improved list view column resizing.
- Improved list view scrolling.
- Secure edit control performance improvements.
- In some cases, double-clicking the tray icon now brings
KeePass to the foreground. - Improved concurrent UI behavior during auto-type.
- Auto-Type: improved compatibility with keyboard layouts with
combining apostrophes, quotation marks and tildes. - Auto-Type: improved virtual key translation on Unix-like
systems. - KPScript: the » command now also updates the time
fields of all affected entries. - KPScript: the » and » commands
now create deleted object information (improving
synchronization behavior). - Upgraded installer.
- Various code optimizations.
- Minor other improvements.
Bugfixes:
- When auto-typing a sequence containing a
placeholder, the raw new password is now stored (in the
password field of the entry), not its corresponding auto-type
sequence. -
Synchronizing two unrelated databases now
always works as expected.
Printing creates a temporary file. Will it be erased securely?
KeePass creates a temporary HTML file when printing password lists and showing
print previews. This file is securely deleted when closing the database.
You must wait for the file being printed completely before closing KeePass
(and close the print preview before closing KeePass), otherwise it could happen
that the printing application blocks KeePass from deleting the file.
There is no way around the temporary file in the current printing system.
If you want to write a plugin that directly sends the data to the printer, you can
find a plugin development tutorial here:
KeePass 2.x Plugin Development.
How to store and work with large amounts of (formatted) text?
KeePass 1.x Only
There is no direct support for storing and working with large formatted texts.
KeePass 2.x Only
|
KeePass has a built-in editor that allows working conveniently with large amounts of (formatted) texts. To add a large text to an entry, import the file as attachment (or click ‘Attach’ → ‘Create Empty Attachment’). The built-in editor supports *.TXT (simple text) and *.RTF (formatted text) files. In order to edit an attachment, right-click onto the entry in the main window, point on ‘Attachments’ and click ‘YourFile.*‘. Alternatively, if the text file is the only attachment, you can open it by just double-clicking onto it in the main window (enable showing the attachment column in ‘View’ → ‘Configure Columns’ → ‘Attachments’). Alternatively, it’s also possible to click the name of the attachment in the entry details view in the main window. For TXT files, the built-in editor supports standard operations like cut, copy, paste, undo, word wrap, etc. For RTF files, additionally standard formatting commands are available: choosing the font, font size, bold, italic, underline, strikeout, text and background colors, align left/center/right, etc. |
Plugin Installation and Uninstallation
If there are no explicit instructions how to install the plugin,
follow these steps:
- Download the plugin from the page above and unpack the ZIP file to a
new folder. - In KeePass, click ‘Tools’ → ‘Plugins’ → button
‘Open Folder’; KeePass now opens a folder called ‘Plugins’.
Move the new folder (containing the plugin files) into the ‘Plugins’ folder. - Restart KeePass in order to load the new plugin.
To uninstall a plugin, delete the plugin files.
Linux:
On some Linux systems, the package may be
required for plugins to work properly.
Portability:
PLGX plugins are compiled by KeePass and the generated files are stored
in a , which by default is located in the
user’s application data directory (so, running a PLGX plugin by default
creates files outside the KeePass application directory).
These plugin cache files do not need to be copied to other systems though,
because they are generated on each system and do not contain any user data.
Installer program (KeePass-1.xx-Setup.exe file)
The KeePass development team provides an installer, which copies KeePass
to your hard disk, creates shortcuts in the start menu and associates
KDB files with KeePass, if desired.
Additionally, KeePass is automatically configured to store its settings in
the application data directory of the current user.
This way multiple users can use one KeePass
installation without overwriting each other’s settings (each user has his
own configuration file).
The setup program must run with administrative
rights, however KeePass runs fine without administrative rights once it
is installed.
Installation:
To install KeePass, run the file
and follow the wizard.
Updating:
Run the file.
You do not need to uninstall the old version first.
Your configuration options will not be lost.
Uninstallation:
In order to uninstall KeePass, run the uninstallation program, which is
accessible by a shortcut in the start menu folder of KeePass, or in
the program section of the system control panel. If you also want
to remove your configuration settings, you need to delete the configuration
file in the application data directory of your user profile, see
Configuration.
Silent Installation:
The KeePass installer supports command line
switches for silent installation, i.e. the program gets installed without
asking the user for target directory or association options. The default settings
of the installer are used.
The command line switch performs a silent
installation and shows a status dialog during the setup process. No questions
will be asked though.
The command line switch performs a silent
installation and does not show a status dialog during the setup process.
Destination Path:
The installer allows to choose the destination path to which KeePass is
installed.
However, when the installer detects an existing KeePass installation, it
assumes that the user wants to perform an upgrade and thus doesn’t
display the destination path selection page; the old version will be overwritten
by the new version.
If you want to move an existing KeePass installation to a different path,
first uninstall the old version; the installer of the new version will then
display the destination path selection page again.
How to Import Data from Steganos Password Manager 2007
Warning! It is possible that the transfer fails and that KeePass accidently
overwrites your existing passwords in Steganos Password Manager. Therefore backup your
SEF file before starting the import! In any case you should restore your passwords by
restoring the backup you just created after the import process! Even if you think
KeePass hasn’t changed anything, restore from the backup!
Unfortunately Steganos Password Manager (SPM) lacks any form of export functionality. As the
SEF file format (in which the data is stored) is proprietary and no specification
is available, KeePass needs to try to get all the data out of the windows of
SPM.
The import process works as follows. First you start SPM and open your password
database. The main password management window should be open (i.e. the one which lists
your items in the middle of the screen, and got toolbar-like buttons at the top). Make
sure that all your items are displayed in the list (select the correct filter in
the combobox above the item list).
Now switch to KeePass 2.x and open your KeePass database. Go File → Import and
choose Steganos Password Manager 2007. Click . Now read the rest before continuing.
After pressing the button in the KeePass import confirmation dialog, you got
10 seconds to switch to the SPM window. Select the very first entry within the SPM window
(but do not open it, just select it). This is important! The first entry must have the
keyboard focus and must be selected.
When the 10 seconds are over, KeePass will start importing. You will see how
KeePass opens the SPM items, copies the data, closes the item’s window, select the
next item, etc. Everything goes automatic now and you can just sit back and watch.
Sometimes Windows playes a ding sound, this is normal.
Note that it can take quite some time to import your items. Do not do
anything while KeePass is importing! One single mouse click or keypress can ruin the
complete import process.
The last item will be scanned twice. When completed, KeePass will
show a message «The import process has finished!».
It is possible that KeePass failed to import some items (mainly caused by SPM’s
unpredictable slow response times). It is highly recommended that you compare each of
the entries.
Пленных не брать, незашифрованных не оставлять
В выборе файлов-«заложников» KeyPass тоже непритязателен. Если многие шифровальщики предпочитают портить документы с определенными расширениями, то этот обходит стороной только несколько папок, обозначенных в его «черном списке». Все остальное содержимое компьютера он превращает в абракадабру с расширением .KEYPASS. На самом деле он шифрует файлы не целиком, а только первые пять мегабайт в самом начале каждого из них, но легче от этого не становится.
В «обработанных» директориях зловред оставляет записку в формате .TXT, в которой его авторы на не очень грамотном английском требуют приобрести специальную программу и индивидуальный ключ для восстановления файлов. Чтобы жертва могла убедиться, что не потратит деньги впустую, ей предлагают отправить злоумышленникам от одного до трех небольших файлов, которые те обещаются расшифровать бесплатно.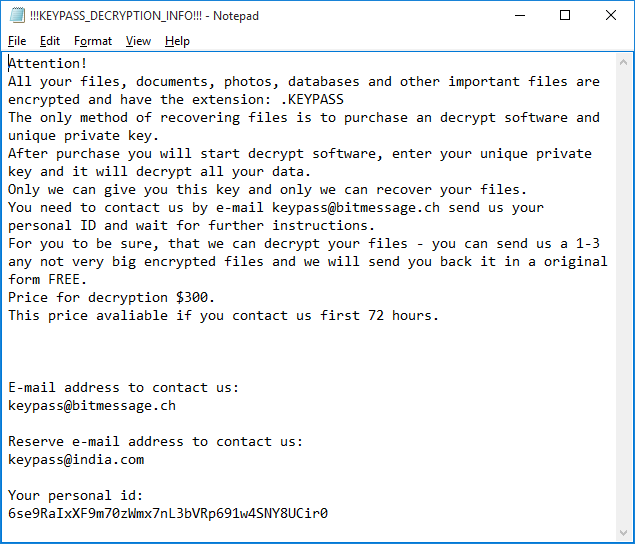
Интересная особенность: если на момент начала работы зловреда компьютер по каким-то причинам не был подключен к Интернету, то KeyPass не сможет получить от командного сервера персональный ключ шифрования. Тогда он использует записанный прямо в коде программы ключ, то есть расшифровать файлы в этом случае можно без каких-либо проблем – за ключом далеко ходить не надо. В остальных случаях так легко не отделаться – несмотря на довольно простую реализацию шифрования, ошибок мошенники не допустили.
В известных нам случаях зловред действовал автоматически, однако его авторы предусмотрели возможность ручного управления. Они явно рассчитывают на то, что KeyPass можно распространять и вручную, то есть планируют использовать его для таргетированных атак. Если злоумышленник получает возможность подключиться к компьютеру жертвы удаленно и загрузить туда шифровальщик, то по нажатии специальной клавиши он может вызвать специальную форму. В ней он может поменять параметры шифрования, в том числе список папок, которые KeyPass не трогает, а также текст записки и индивидуальный ключ.
Как не бояться шифровальщиков
Поскольку программу для расшифровки файлов, попорченных вымогателем KeyPass, пока не разработали, то единственный способ от него защититься – не допустить заражения. Да и в любом случае проще сразу подстраховаться, чем потом долго и мучительно разгребать последствия – так тратится куда меньше сил и нервов. Поэтому мы рекомендуем несколько простых мер по защите от шифровальщиков, которые подходят в том числе и против KeyPass:
- Не скачивайте неизвестные программы с сомнительных сайтов и не переходите по ссылкам, если они вызывают у вас хотя бы малейшие подозрения. Это поможет вам избежать большей части зловредов, гуляющих по Сети.
- Обязательно делайте резервные копии важных файлов. О том, как, куда и как часто надо делать бекапы, вы можете узнать из вот этого поста.
Пользуйтесь надежным защитным решением, которое распознает и заблокирует подозрительную программу прежде, чем она сможет нанести вред вашему компьютеру. Kaspersky Internet Security, например, содержат специальный модуль для борьбы с шифровальщиками.
Installer program (KeePass-2.xx-Setup.exe file)
The KeePass development team provides an installer, which copies KeePass
to your hard disk, creates shortcuts in the start menu and associates
KDBX files with KeePass, if desired.
Additionally, KeePass is automatically configured to store its settings in
the application data directory of the current user.
This way multiple users can use one KeePass
installation without overwriting each other’s settings (each user has his
own configuration file).
The setup program must run with administrative
rights, however KeePass runs fine without administrative rights once it
is installed.
Installation:
To install KeePass, run the file
and follow the wizard.
Updating:
Run the file.
You do not need to uninstall the old version first.
Your configuration options will not be lost.
Uninstallation:
In order to uninstall KeePass, run the uninstallation program, which is
accessible by a shortcut in the start menu folder of KeePass, or in
the program section of the system control panel. If you also want
to remove your configuration settings, you need to delete the configuration
file in the application data directory of your user profile, see
Configuration.
Silent Installation:
The KeePass installer supports command line
switches for silent installation, i.e. the program gets installed without
asking the user for target directory or association options. The default settings
of the installer are used.
The command line switch performs a silent
installation and shows a status dialog during the setup process. No questions
will be asked though.
The command line switch performs a silent
installation and does not show a status dialog during the setup process.
Destination Path:
The installer allows to choose the destination path to which KeePass is
installed.
However, when the installer detects an existing KeePass installation, it
assumes that the user wants to perform an upgrade and thus doesn’t
display the destination path selection page; the old version will be overwritten
by the new version.
If you want to move an existing KeePass installation to a different path,
first uninstall the old version; the installer of the new version will then
display the destination path selection page again.
Options/Components:
The installation options/components are explained in detail here:
.
Настройка KeePass
Есть огромное количество пользователей, которые используют данный менеджер паролей, но не все умеет правильно настроить программу. А настройка в случае с этой программы является очень важным делом. Правильная настройка поможет защитить ваши пароли.
Безопасность
На вкладке «Безопасность» есть несколько очень важных настроек, которые необходимо отметить.
- Блокировать при бездействии
- Блокировать при общем бездействии
- Автоочистка буфера обмена
- Блокировать при использовании удаленного доступа
- и т.д.
Смотрите рисунок ниже, где я отметил самые важные настройки, которые необходимо отметить для обеспечения лучшей защиты менеджера паролей.
Настройка KeePass: Безопасность
Все остальное на ваше усмотрение.
Политика
На вкладке «Политика» вы можете разрешить или запретить выполнения некоторых операций. Таких как:
- Распечатку паролей
- Экспорт информации
- Копирование информации
- Загрузка плагинов
- Изменение мастер-пароля
- и т.д.
Настройка KeePass: Политика
В данной вкладке вы можете отключить все в зависимости от ваших нужд. К примеру, если у вас нет необходимости в распечатке информации из программы, можете спокойно отключить данную опцию убрав галочку. Тоже самое по поводу использование плагинов и экспорта записей.
Чем больше ненужного отключите в этой вкладке, тем более надежнее будет менеджер паролей и пароли, которые вы храните в нем.
Дополнительно
На вкладке «Дополнительно» есть не мало очень важных настроек, таких как:
- Запоминание и автоматическое открытие недавно открытого файла-паролей
- Автоматический поиск файл ключей
- Запоминание директории, в которой последний раз находился файл-паролей.
- и т.д.
Настройка KeePass: Дополнительно
Я рекомендую выставить настройки вкладки «Дополнительно» так, как это показано на рисунке выше. Настоятельно не рекомендую отмечать пункт «Запоминать и автоматически открывать последнюю базу паролей…»
Changes from 2.39.1 to 2.40:
New Features:
- Added automatic completion support for the user name box in
the entry editing dialog and the
auto-type sequence boxes in
the entry/group editing dialogs (suggesting user names and
auto-type sequences that are used in other entries/groups). - Added automatic completion support for the URL and user name
boxes in the ‘Open From URL’
dialog (suggesting URLs and user names of items in the list
of most recently used database files). - Added option ‘Group path’ in the ‘Find’ dialog (enabled by
default for quick searches). - Added read-only mode for the entry string dialog, which is
used by the entry dialog when viewing a history entry. - The internal data viewer now supports zooming images using
Ctrl+Add,
Ctrl+Subtract and the mouse wheel
with Ctrl;
furthermore, there are now ‘+’ and ‘-‘ buttons right of the
zoom selection box in the toolbar. - Added option ‘Remember master password (in encrypted form) of
a database while it is open’ (which is the default; turning
off this option prevents the usage of certain features). - Enhanced compatibility check for DLL plugins.
- Added URL opening event for plugins.
- On Unix-like systems: added support for opening the local
help file with KChmViewer. - Added workaround for initial input focus problem in the
master key prompt dialog. - Added workaround for Mono not always raising the
event properly. - TrlUtil now remembers the last translation file directory.
Improvements:
- The ‘Configure Columns’ dialog now computes a display order
for the new columns, taking the previous display order into
account. - While importing/synchronizing, no status dialog is displayed
anymore (the status is displayed in the main window). - Improved UI responsiveness during long operations.
- When hiding/restoring the main window via the system tray
icon fails, KeePass now shows a notification. - Improved Return key handling in text boxes.
- Improved initial input focus in some dialogs.
- Enhanced database file path unification.
- The configuration
system does not create a KeePass folder in
the user’s application data folder anymore when the target
configuration file location is outside this folder. - Improved window text query method.
- Improved Unicode environment detection.
- Various improvements for right-to-left writing systems.
- Improved support for case-sensitive
command line parameter
names (for plugins and KPScript). - If a plugin is available both as a DLL and as a PLGX (in the
same folder), KeePass now loads either the DLL or the PLGX. - For plugins: most public definitions are now static.
- KPScript: improved parsing of escape sequences.
- Renamed native support library item in the installer.
- Upgraded installer.
- Various code optimizations.
- Minor other improvements.
Bugfixes:
(None).